raspberry lemonade

Sunday, May 30, 2010

When I hear people complain about the heat, I want to punch them in the kidneys. But that would be rude. So, I make lemonade instead. Nothing cures a case of summer-heat-woes better than an ice cold glass of homemade raspberry lemonade. It's refreshing and core-cooling. And there's really just something therapeutic about juicing lemons the old fashioned way, isn't there?

10 lemons, juice and zest of
7 cups water
3(ish) cups ice cubes
2 cups raspberries (Fresh or frozen. I prefer fresh. Also, 2 cups is only a suggestion. Go nuts.)
simple syrup (1 cup water, 1 cup granulated sugar)
fresh mint leaves for garnishing (optional)

1. Zest those lemons. All of 'em. That's where all of that awesome lemon flavour is hiding.

2. Now juice them! Tip: roll those bitches around on the counter (somewhat agressively) before you half and juice them. It just makes it a little easier to get as much juice as possible out of them.

3. Add the zest to the juice, and let it stand for an hour or so.

4. Meanwhile, prepare simple syrup. (Combine 1 cup water and 1 cup sugar in sauce pan over medium-high heat. Bring to boil, and then remove from heat. Pour into glass container and let it cool in the fridge before using.)

5. Strain lemon juice into a large juice pitcher with ice.

6. Add simple syrup, water, and raspberries. Stir. 

7. Garnish with mint leaves. (optional)


Makes a great mixed drink with vodka, rum, or gin -- all tried and tested by your's truly, I don't mind saying.


So, stop complaining about this beautiful, hot summer weather. It's not too hot. You just need some lemonade.


vegan chocolate buttercream icing

Friday, May 28, 2010

If you like chocolate icing, you will looooooove this recipe. It. Is. Decadent.


You'll need an electric beater for this recipe (also what she said.)
Yields enough icing for 12 cupcakes. Double or triple for whole cakes.

1/4 cup nonhydrogenated shortening
1/4 cup nonhydrogenated margarine (Earth Balance or vegan Becel)
1 1/2 cups icing sugar, sifted
1/8 heaping cup cocoa powder, sifted
1  teaspoons vanilla extract
1/8 cup chocolate soy milk


1. With a fork, cream shortening and margarine together with a fork.

2. Add cocoa and beat on low-medium speed until completely mixed.

3. Add soy milk, and beat on low speed until completely mixed. Beat on medium-high speed until entire amount of sugar is used. (You might adjust the amount of sugar according to your desired sweetness. Just stick your finger in and taste it. Don't be afraid.)

5. Add vanilla and mix on medium-high speed until fluffy, about two minutes.

Enjoy!

vegan buttercream icing

Sunday, May 2, 2010

I've been promising a lot people that I'd share this recipe with them, so here it (finally) is! This is my go-to recipe for vegan cupcakes. It's versatile and delicious and, like always, super simple. The ingredients are also easy to find which is a nice change for a vegan recipe. There's no 'essence of organic butterfly tears' in this recipe. You're welcome.

You'll need an electric hand mixer.
Yields enough icing for 12 cupcakes.

1/4 cup nonhydrogenated vegetable shortening
1/4 cup nonhydrogenated margarine (I use Becel)
1 3/4 cups powdered sugar, sifted
1 teaspoons flavour extract
1/8 cup plain soy milk

1. With a fork, cream shortening and margarine together with a fork.

2. Add the sifted icing sugar 1/4 cup at a time. Mix using electric mixer until all sugar is used.  (You might adjust the amount of sugar according to your desired sweetness)

3. Add soy milk and flavour extract and mix on low-medium speed until fluffy (usually about two minutes, adjusting for room temperature and other various 'acts of God')

I usually let it sit in the fridge for 20 minutes or so before I frost my cupcakes with it. It stays fluffy, but it just seems to gain and maintain a some stiffness if it's been chilled before hand.

So that's it. Go nuts with different flavours and colours. You can basically add any flavour extract and colour you want, and the result will always be awesome.

Enjoy!


lavender & lemon cookie recipe

Saturday, May 1, 2010

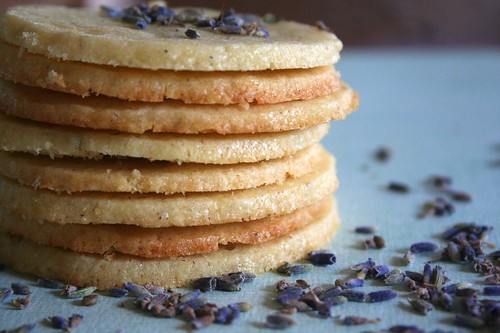
Let me just tell you a little something about these cookies. Whoever thought of putting lemon and lavender together was brilliant. What an interesting and delicious combination. In every bite, you can taste the individual flavours: the bright and tart citrusy flavour of lemon zest, and the wonderfully light and floral flavour of the lavender. When you bake these two flavours together, they marry beautifully.

Refreshing, loaded with flavour without being overbearing, and super simple. These cookies are perfect to have with a hot cup of tea or a cold glass of iced tea.

3/4 cup white sugar
2 tbsp grated lemon zest
2 tbsp lemon juice
2 tsp dried lavender
1 3/4 cup all-purpose flour
1/4 tsp baking powder
1/4 tsp sea salt
12 tbsp (1 1/2 sticks) cold unsalted butter, cut into 1/2" cubes
1 egg yolk
1/2 tsp pure vanilla extract

(If you don't have a food processor, follow these by-hand directions)

1. In a food processor, combine sugar, lemon zest and lavender until completely incorporated and sugar is damp from zest.

2. In a large bowl, sift together flour, salt, and baking powder.

3. Combine sugar/lemon/lavender mixture with the flour mixture with a whisk.

4. Return this mixture to food processor, and then scatter butter cubes over mixture, and process until mixture resembles cornmeal.

5. In a measuring cup, beat together the lemon juice, egg yolk and vanilla.

6. Slowly add the egg mixture to the food processor while it's running, and continue processing until the dough forms into a ball.

7. Move dough to a clean, dry work surface, and roll it quickly into a cylinder. It should be approximately 12 inches long and 1 1/2 inches in diameter.

8. Wrap the dough tightly in plastic wrap and chill in the fridge for 2 hours or in the freezer for 40-45 minutes.

9. Preheat oven to 375 degrees.

10. Cut chilled dough into cookie slices that are approximately 3/8 of inch thick.

11. Spray cookie sheet with non-stick spray, and place cookies 1 inch apart.

12. Baking time can be anywhere from 10 to 16 minutes, depending on the thickness of your cookies and on your oven. If they aren't finished after 10 minutes, just keep a momentary eye on them until the edges have browned slightly.

13. Let cool completely on racks. Store in sealed container for longer lasting freshness.


Enjoy!


(picture from When Harry Met Salad)

mini baklava recipe

Friday, April 30, 2010

WARNING -- The following recipe is a labor of love. And that's probably an understatement. Though this is like daisy picking in comparison to making homemade pasta without a pasta machine (what was I thinking?), it's still a lot of work. However, the end almost always justifies the means, right? Right. The hard work contained in this recipe is well worth it, I promise.

This is my rendition of Giada de Laurentiis' mini baklava recipe.

You'll need a mini muffin tin.


1/2 cup almonds
1/2 cup walnuts
1/4 cup plain bread crumbs
2 tablespoons sugar
1 1/2 teaspoons ground cinnamon
1/4 teaspoon ground cloves
Pinch of sea salt
1 cup unsalted butter, melted
3 tablespoons honey (I use President's Choice Organic Creamed Wildflower Honey because it adds another dimension of floral flavour)
6 sheets fillo dough


1. Preheat the oven to 350 degrees.

2. Place the almonds, walnuts, bread crumbs, sugar, cinnamon, ground cloves, and salt in a food processor until the mixture is very finely chopped.

3. Transfer the mixture to a small bowl. Add 2 tablespoons of the melted butter and the honey and stir to combine. (You might want to soften the honey in the microwave just so it's a little easier to mix in.)

4. On a dry work surface place 1 sheet of fillo. Using a pastry brush and the remaining melted butter, lightly cover the entire sheet of phyllo with melted butter.

5. Cover the first sheet with a second sheet of phyllo and brush with melted butter. Continue this process with all six sheets of fillo.

6. Cut the stacked fillo rectangle into 12 equal pieces (Cut lengthwise into 4 pieces and widthwise into 3 pieces.)

7. Very carefully press each cut piece of phyllo into the mini-muffin tin cups.

8. Fill the fillo cups with the nut mixture (approximately 1 tablespoon -- eye ball it)

9. Pinch the fillo cups closed with your fingers.

10. Bake for 20-25 minutes, or until edges are golden brown.

11. Allow to cool before transferring to a serving plate.

vegan vanilla cupcake

Monday, April 26, 2010

I've conquered the vanilla side of vegan cupcakes.
From the very first vegan cupcake I baked a month ago, to the pretty little vanilla cupcakes I baked for my brother and his crude, pimply-faced friends (4/20 MUNCHIES!!!!) I feel like my vegan cupcake journey is far from being over.

The basis for this recipe came from Jennifer McCann, author of the cookbook "Vegan Lunch Box." I changed it up only slightly for the first time using it. You can find the original recipe here.


1 tbsp apple cider vinegar
1 1/3 cups plain soymilk
2 cups pastry flour (or regular all purpose)
2 tsp baking powder
1/2 tsp baking soda
1/2 tsp sea salt (or kosher or table)
1 1/8 cups sugar
1/2 cup canola oil
1 3/4 tsp. pure vanilla extract

(This recipe should yield 22 cup cakes, but I make them slightly larger so I got about a dozen.)

Line your muffin pan with your cupcake liners. Preheat oven to 350 degrees.

Place the apple cider vinegar in the bottom of a liquid measuring cup and fill the cup with soymilk to equal 1 1/2 cups. Stir well and set aside (the mixture will curdle).


In a medium bowl, combine all dry ingredients.

In a large bowl, combine all wet ingredients.

Sift dry into wet ingredients, and then quickly incorporate with a whisk, and then completely mix together with  an electric beater for about a minute. (Or until it looks like everything is mixed and smooth)

Fill muffin cups with 1/4 cup of batter each (or more if you want bigger cupcakes. You'll just have to adjust baking time accordingly)

Bake for 15-20 minutes. If you're making larger cupcakes like I did, do a toothpick test after 20 minutes and sort of use that as a guide. It took about 22-23 minutes for mine.

Let cupcakes cool completely before icing.

Et voila!


simple is sweet.

I know it's not quite strawberry season yet, but I can't help the $1.99 boxes at the grocery store. Strawberries just excite me. So, when I get them home, chop them up, and take a bite, I'm a little let down. They just don't taste like July to me.

"Probably because it isn't July, you moron."

Don't rain on my parade. Just give me STRAWBERRIES THAT TASTE LIKE EFFING STRAWBERRIES, DAMN IT.

Rejoice! All is not lost. I've found a way to breath a little life into out-of-season strawberries. And it's quite simple.

For every 1 cup (ish) of chopped strawberries, add a tsp each of fresh lemon juice and fresh lime juice. You might feel like that's too much, so just play around with the amounts to find which best suit your palette.

Not only does the acidity of the lemon and lime awaken the tired strawberry flavour, but it also adds just a hint of bright and bitter citrus flavour. Like a little morsel of a hot July day by the pool in every bite.

Sweeten with a little fruit sugar (just eyeball it), and then use this delicious and wonderfully fragrant creation as a topping for vanilla ice cream/frozen yogurt/gelato. Oh baby.

Enjoy!


Culinerd Copyright © 2009 Designed by Ipietoon Blogger Template for Bie Blogger Template Vector by DaPino